
Mojo Rooms handbook

From first branch to every shift.

A visual onboarding guide for owners, managers, front desk teams, housekeeping, and reporting staff. Follow it in order for a new setup, or jump to the workflow you need.

Recommended first launch

Configure one pilot branch, make a test booking, and run it through check-in, checkout, cleaning, and reporting.

01 · Orientation

Know where everything lives

The signed-in workspace is organized around three groups: Operate for daily shifts, Setup for configuration, and Growth for marketing. Your role and branch assignment determine what you can see.

Operate

  • Front Desk
  • Housekeeping
  • Bookings
  • Guests
  • Payments
  • Reports

Setup

  • Branches
  • Rooms
  • Durations
  • Add-ons
  • Booking codes
  • Settings and Team

Growth

  • Meta Pixel
  • Branch assignments
  • Conversions API
  • Campaign attribution

Before entering live data

Use a pilot branch and test records. Avoid real guest identification or payment evidence until roles, branch access, privacy procedures, and retention expectations have been reviewed with the team.

02 · Initial setup

Build the sellable inventory in order

Branch readiness follows a dependency chain. Complete branding and branch details first, then room types, physical rooms, durations, pricing, and add-ons. A branch should show 100% readiness before its direct-booking link is promoted.

  1. 01

    Brand your booking pages

    Add the operator name, colors, logo, cover image, and landing-page copy in Settings.

  2. 02

    Create each branch

    Set timezone, currency, booking interval, hours, location, contacts, payment instructions, and policies.

  3. 03

    Build room inventory

    Create reusable room types, assign them to branches, then add every physical room.

  4. 04

    Publish durations and prices

    Define each duration and cleaning buffer, assign branches, and price every room-type combination.

  5. 05

    Add products and fees

    Create guest-selectable add-ons, staff-only charges, and optional automatic extra-guest fees.

  6. 06

    Invite and assign the team

    Choose each person's role and whether they can access all branches or selected branches.
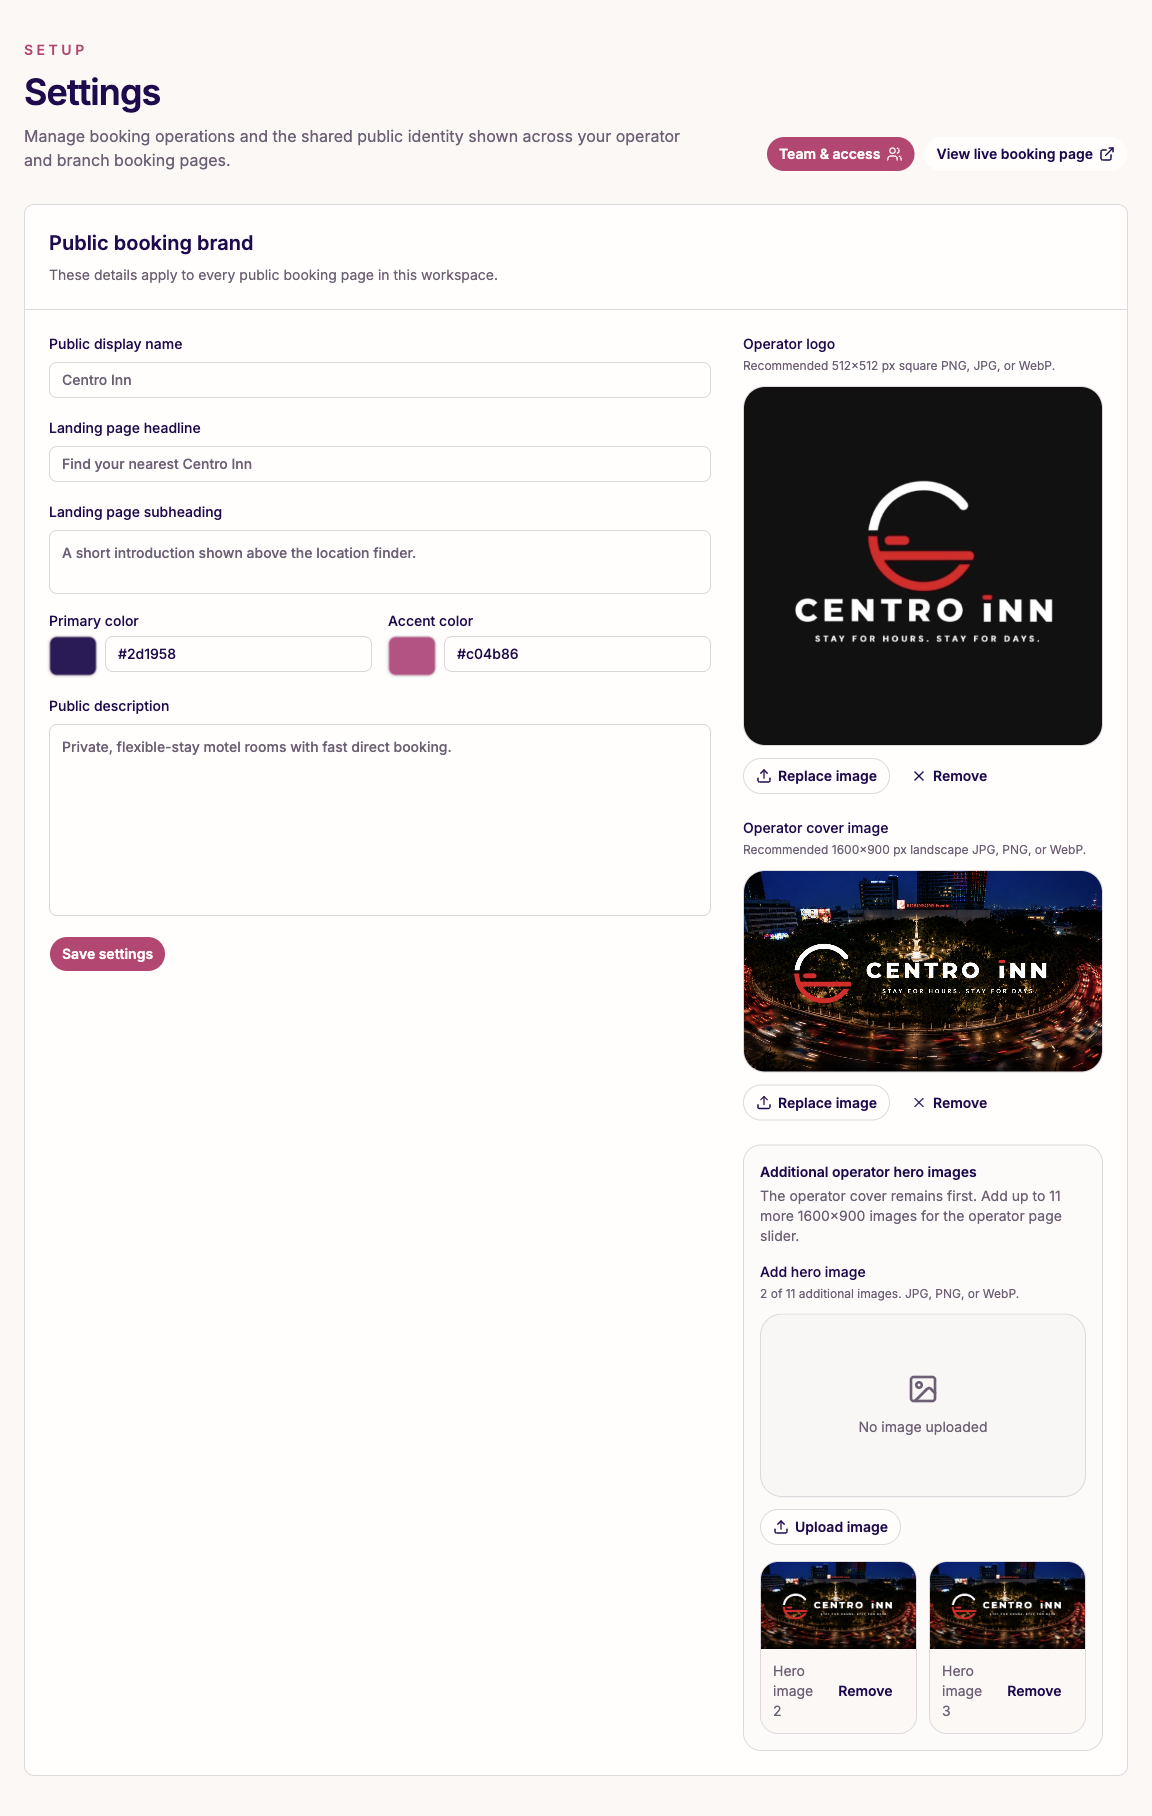
Settings page showing public booking brand fields

Settings: establish the public brand

Set the display name, landing copy, brand colors, logo, and cover imagery shared by every public booking page. Use View live booking page to review changes. Open full size.
Branches page showing a complete readiness checklist

Branches: follow the readiness checklist

Each branch tracks room types, physical rooms, durations, complete pricing, add-ons, and public booking details. Fix incomplete items before activation. Open full size.
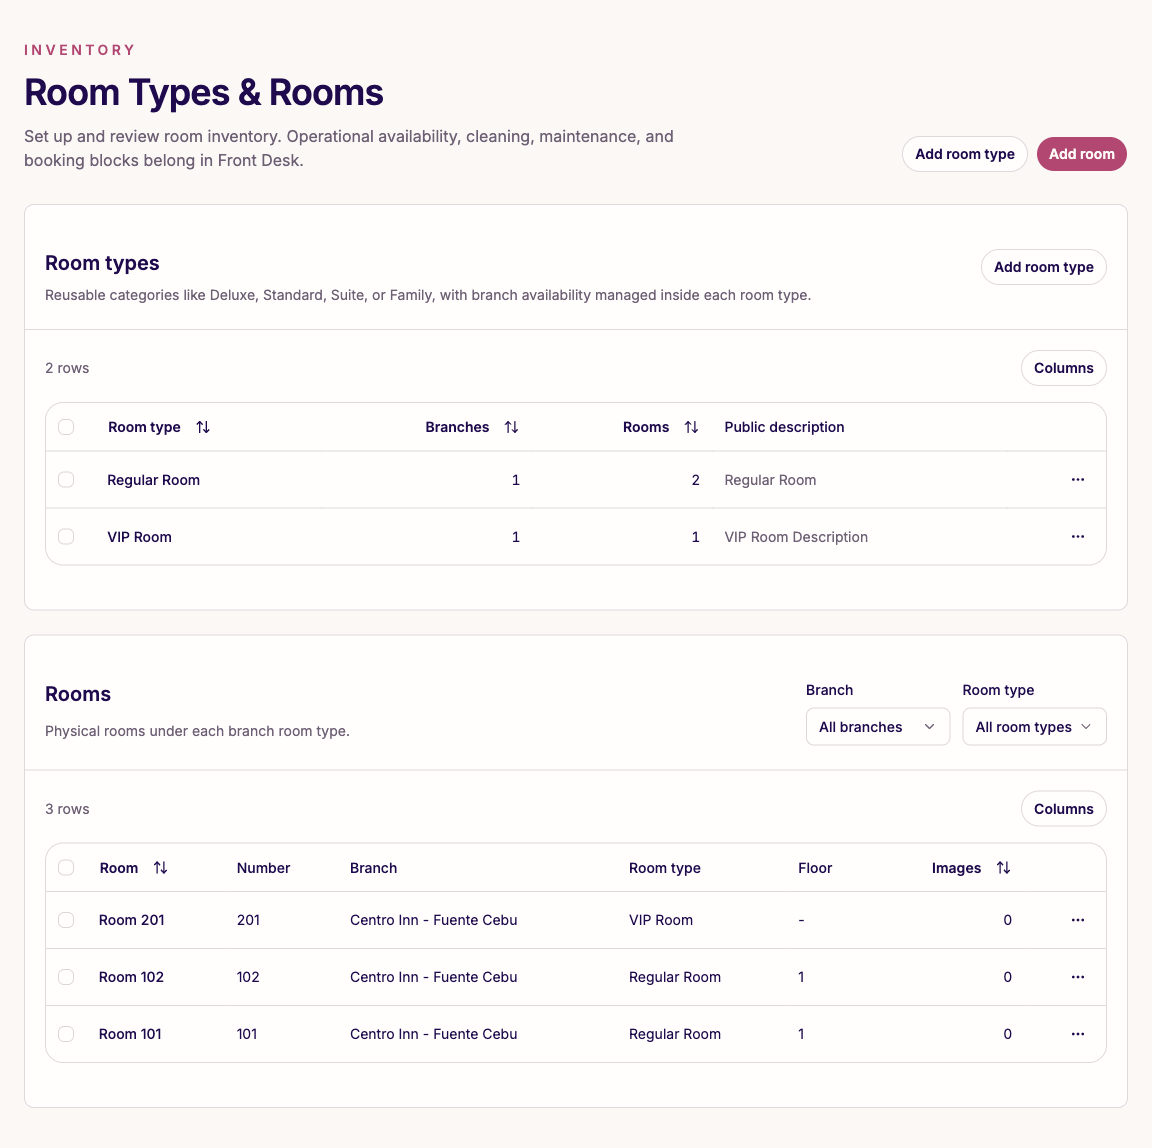
Rooms setup page

Rooms

Create room types first. Assign them to branches and add every physical room number that Front Desk will operate. Open full size.
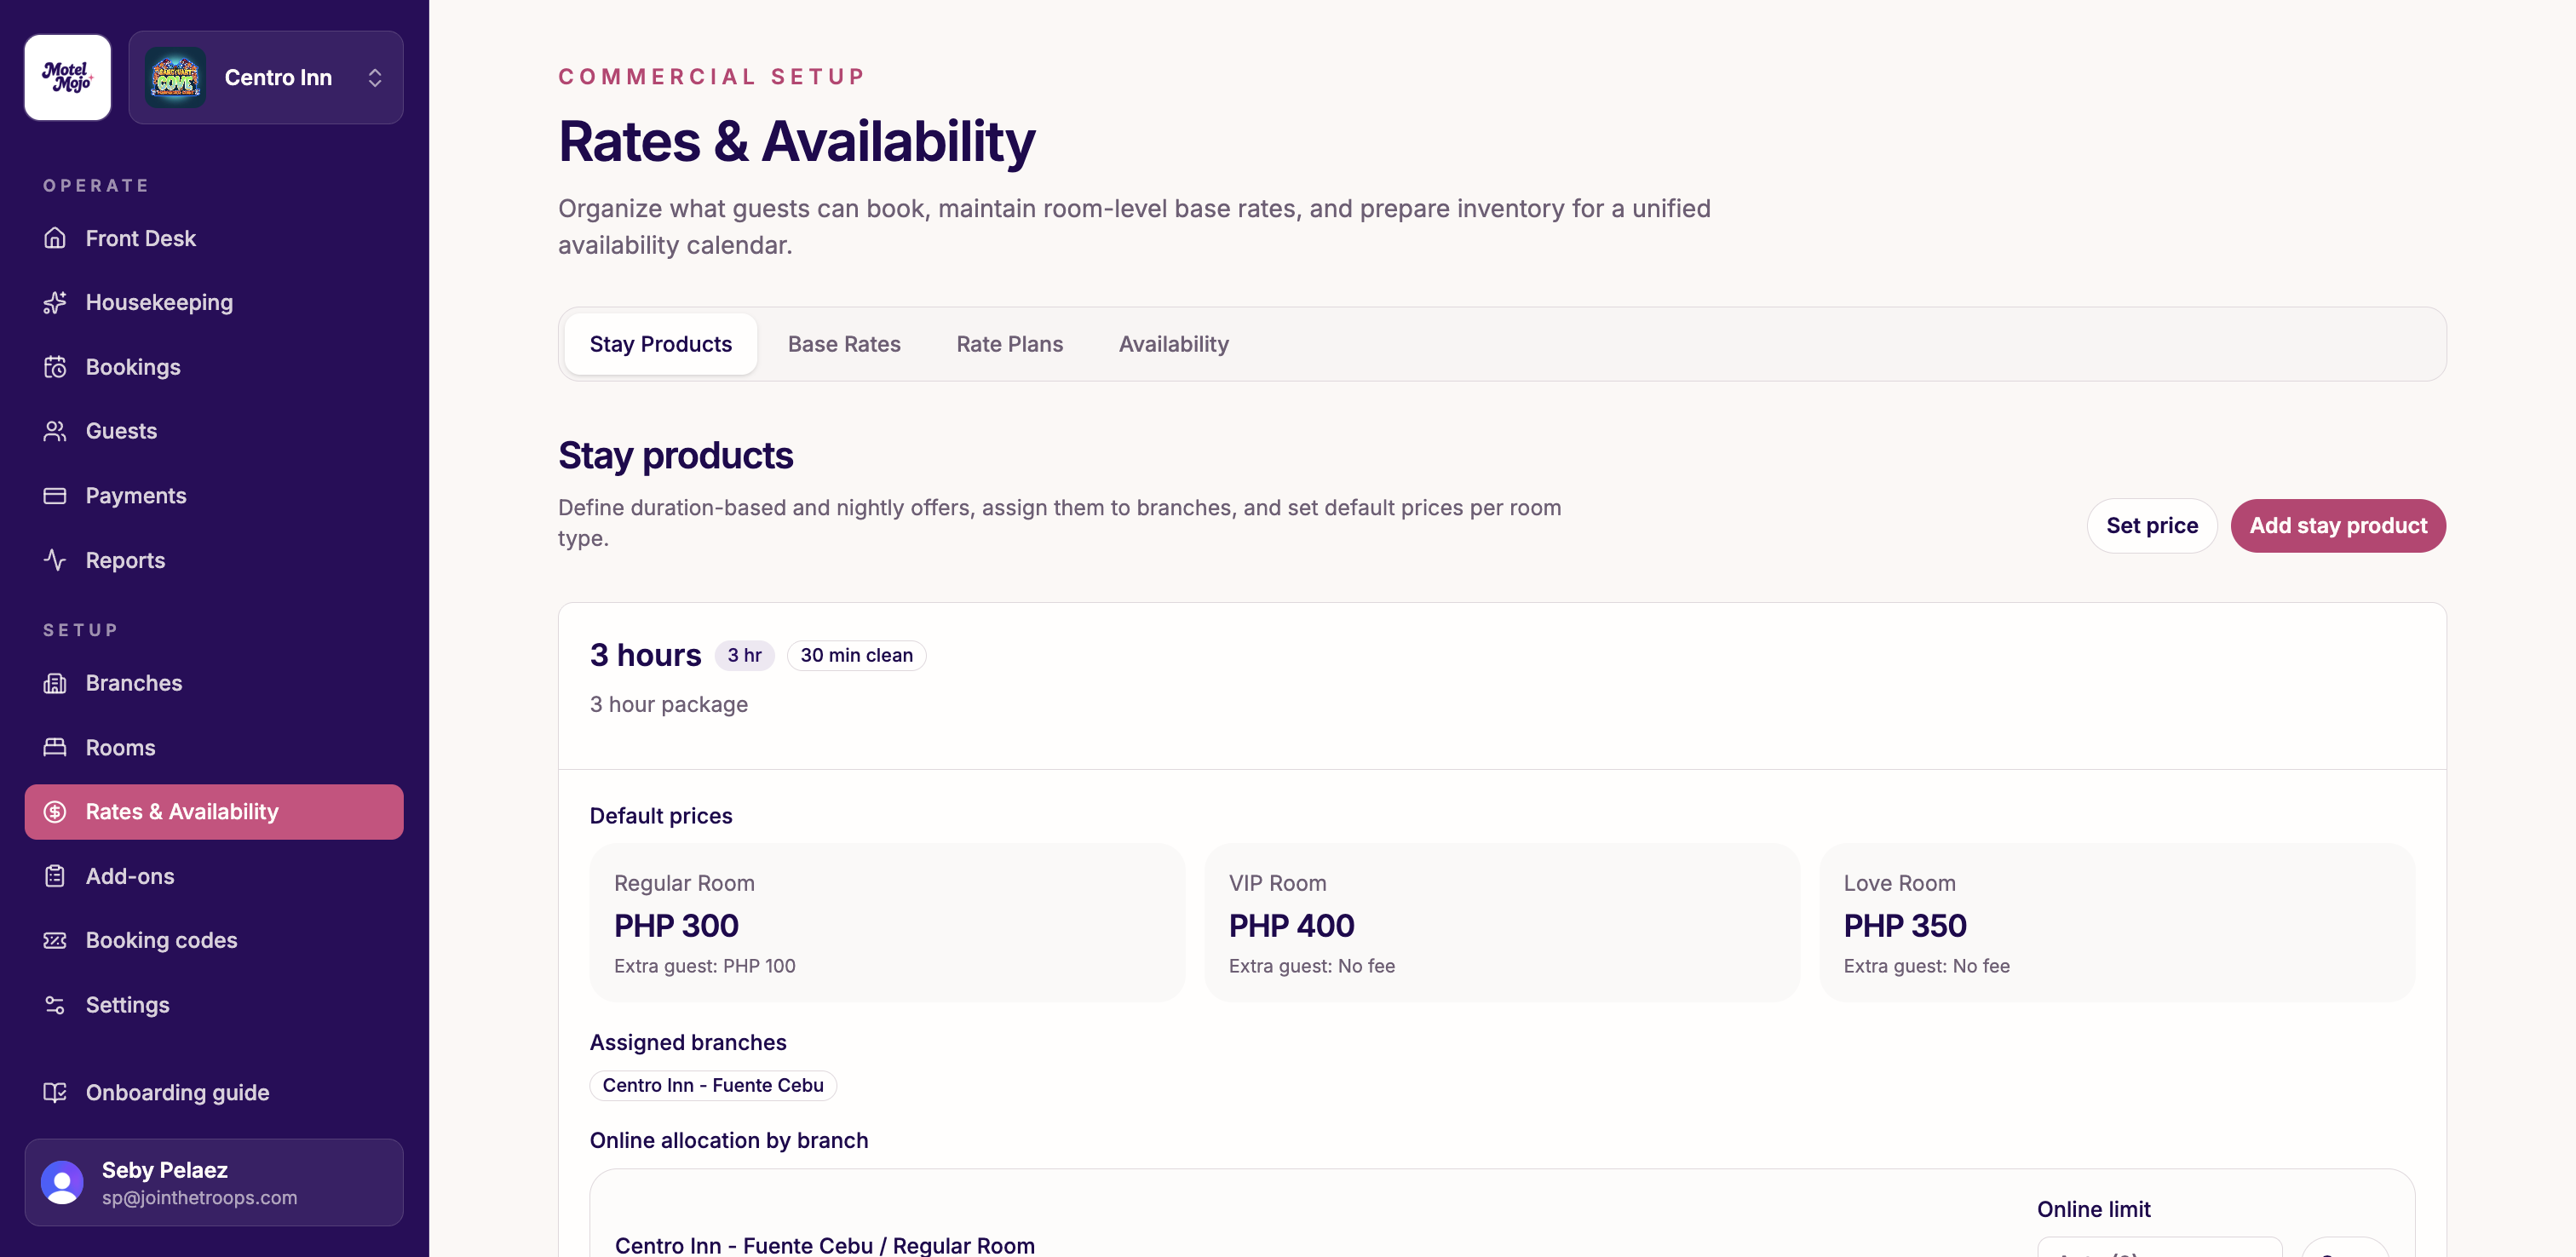
Durations setup page

Durations

Define the stay duration, cleaning buffer, branch availability, room-type pricing, and extension presets. Open full size.
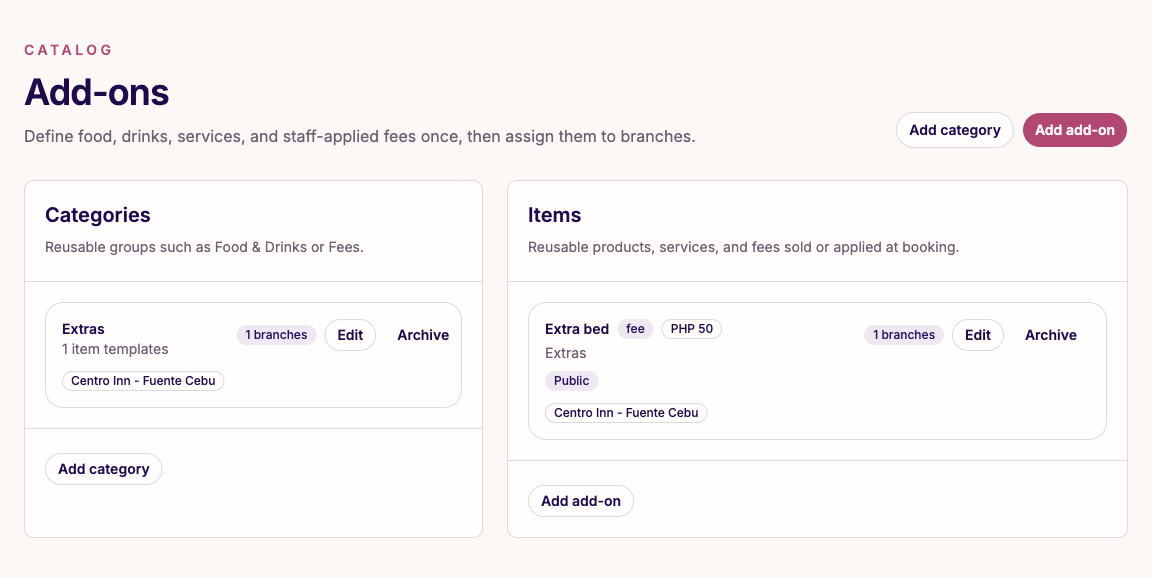
Add-ons catalog

Add-ons

Separate public extras from staff-only fees. Set prices, limits, and branch assignments. Open full size.
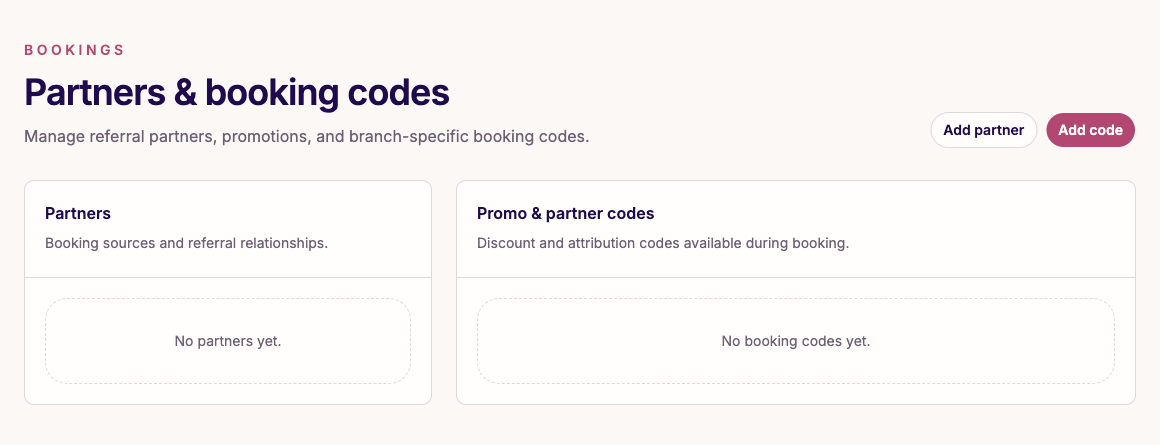
Partners and booking codes page

Partners & booking codes

Create referral partners and codes for attribution, promotions, validity windows, redemption limits, and selected branches. Open full size.

Branch configuration details

  • Choose the correct timezone and currency before taking bookings.
  • Set 24/7 or custom weekly operating hours, including overnight windows.
  • Choose the booking interval and default cleaning buffer.
  • Add address, map position, phone, email, and Messenger link.
  • Write payment instructions, refund policy, house rules, and confirmation-only policies.
  • Upload branch and room galleries that accurately represent the property.

03 · Customer journey

How a customer books directly

The public flow moves from location discovery to a private confirmation code while checking operating hours, room inventory, cleaning buffers, capacity, price, and security again at submission.
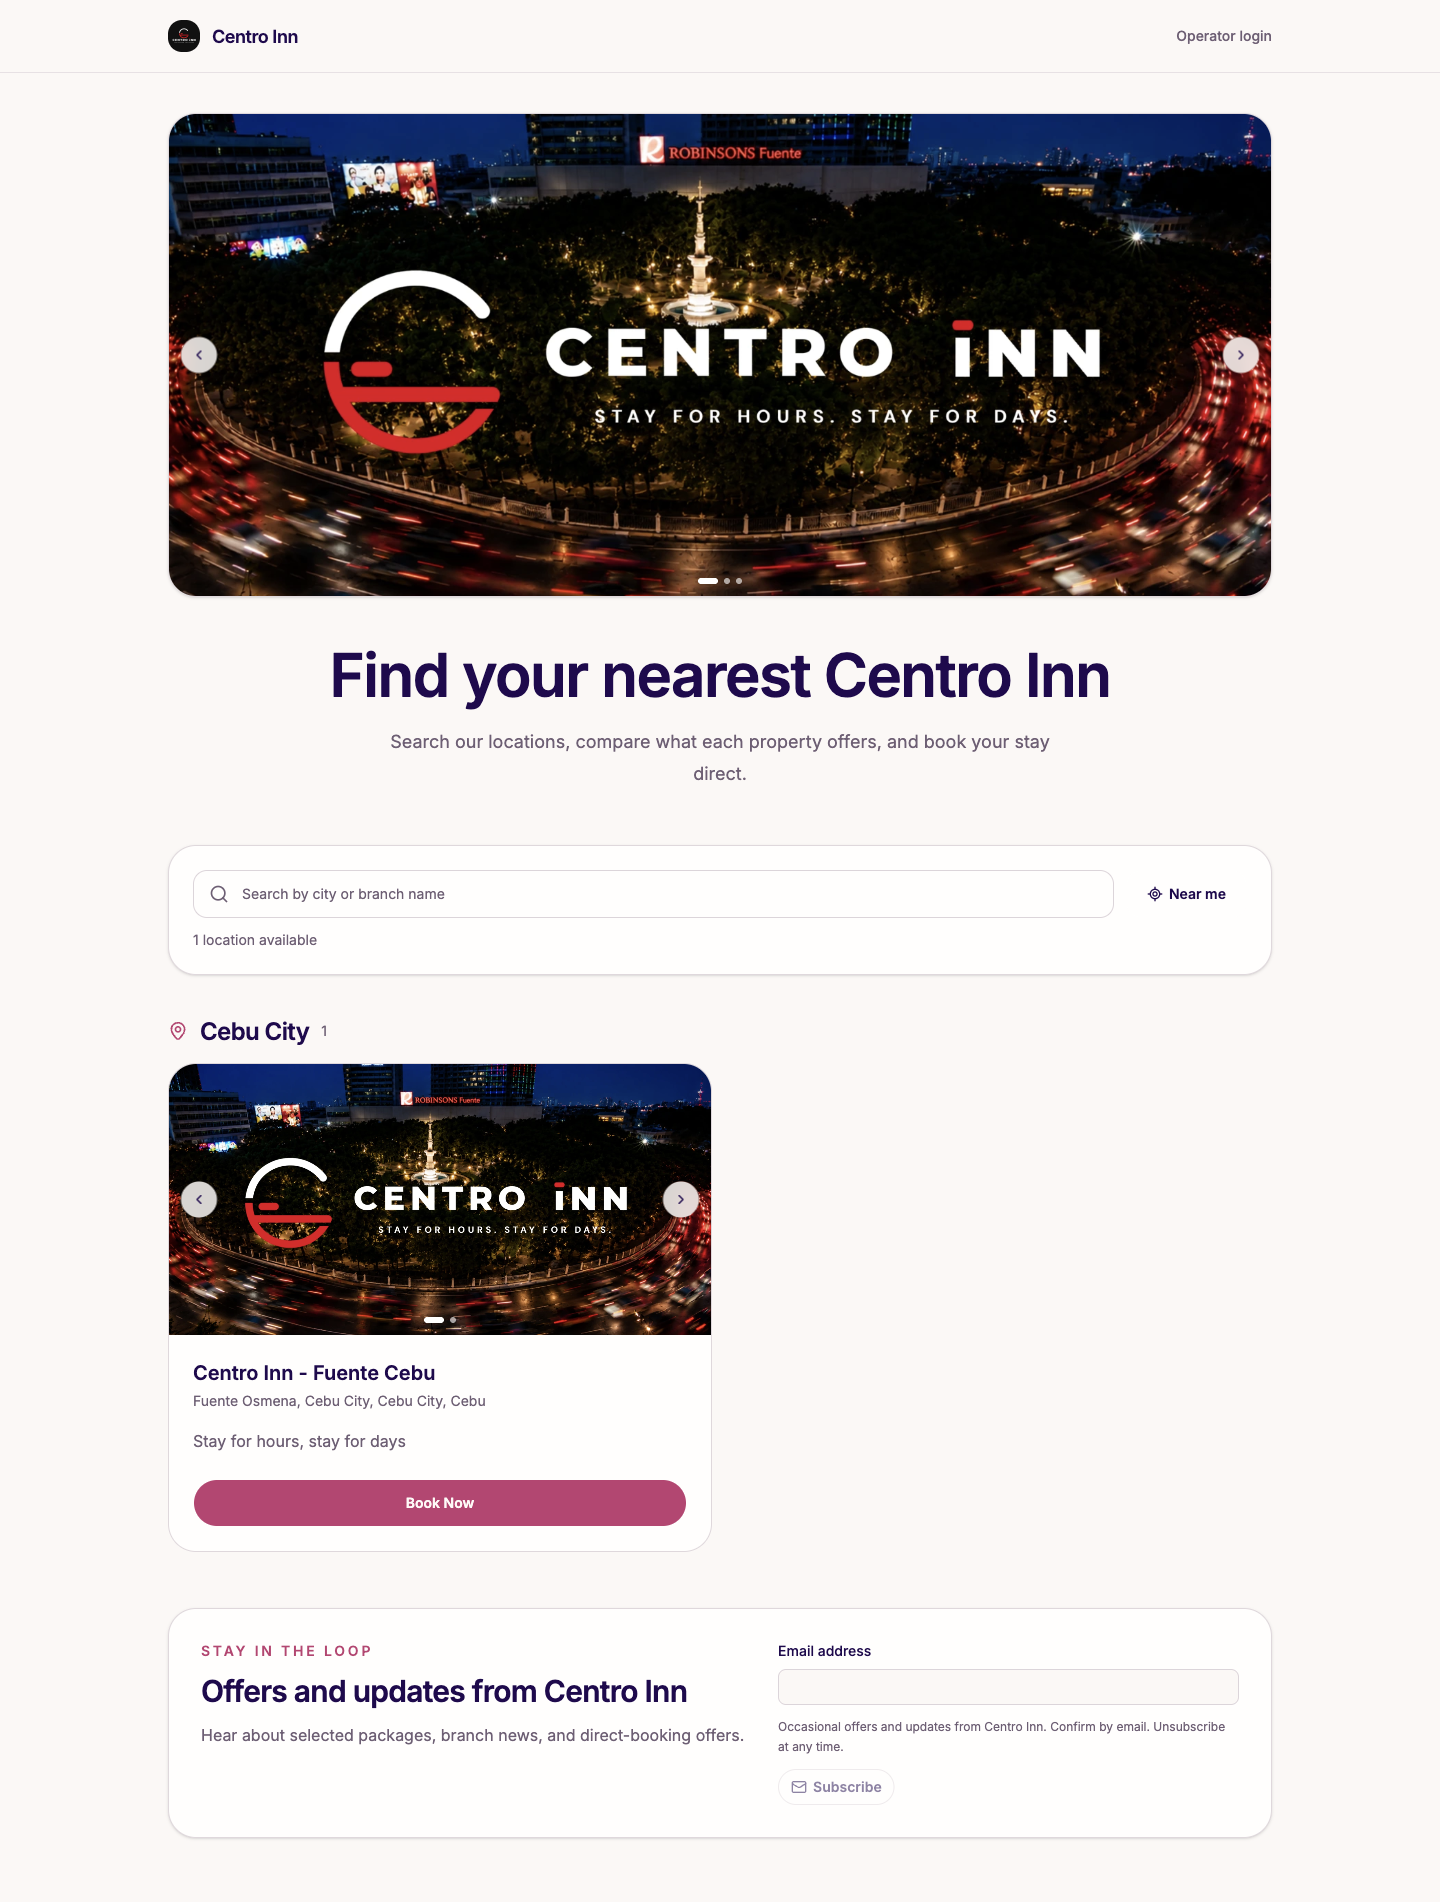
Public operator page showing the branch finder

Step 1 · Find a branch

Customers search locations, browse active branches, optionally sort by distance, and select Book Now. Open full size.
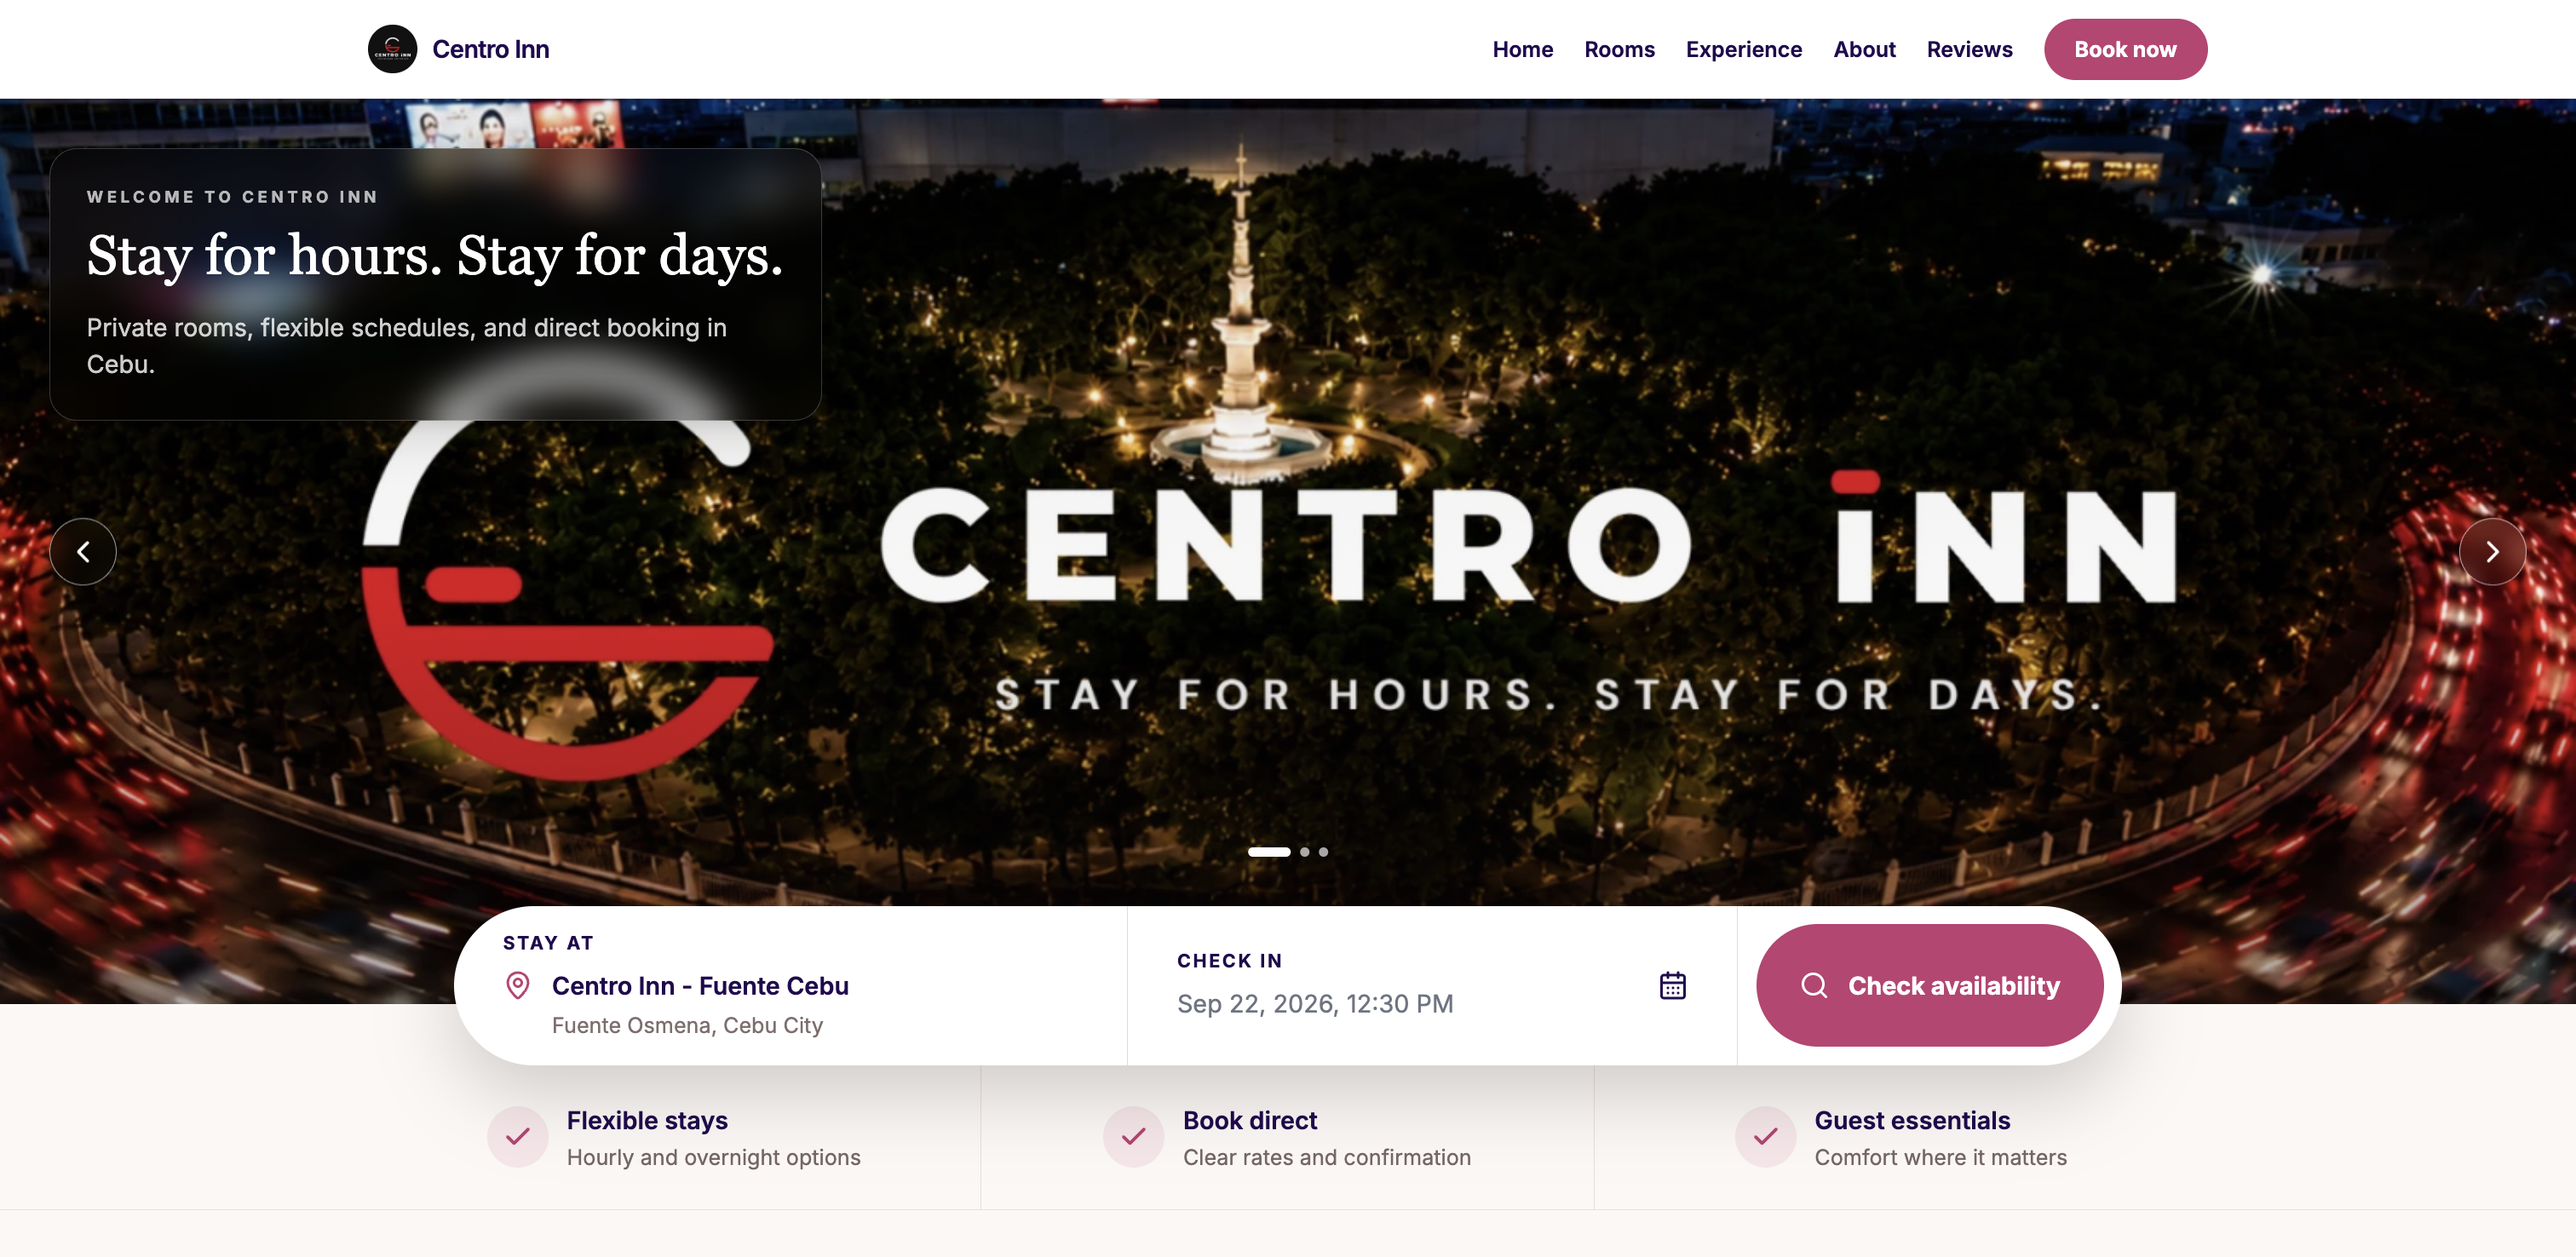
Public branch page showing property details and room choices

Step 2 · Review the property

The branch page presents its gallery, description, amenities, address, room types, and direct contact options. Open full size.
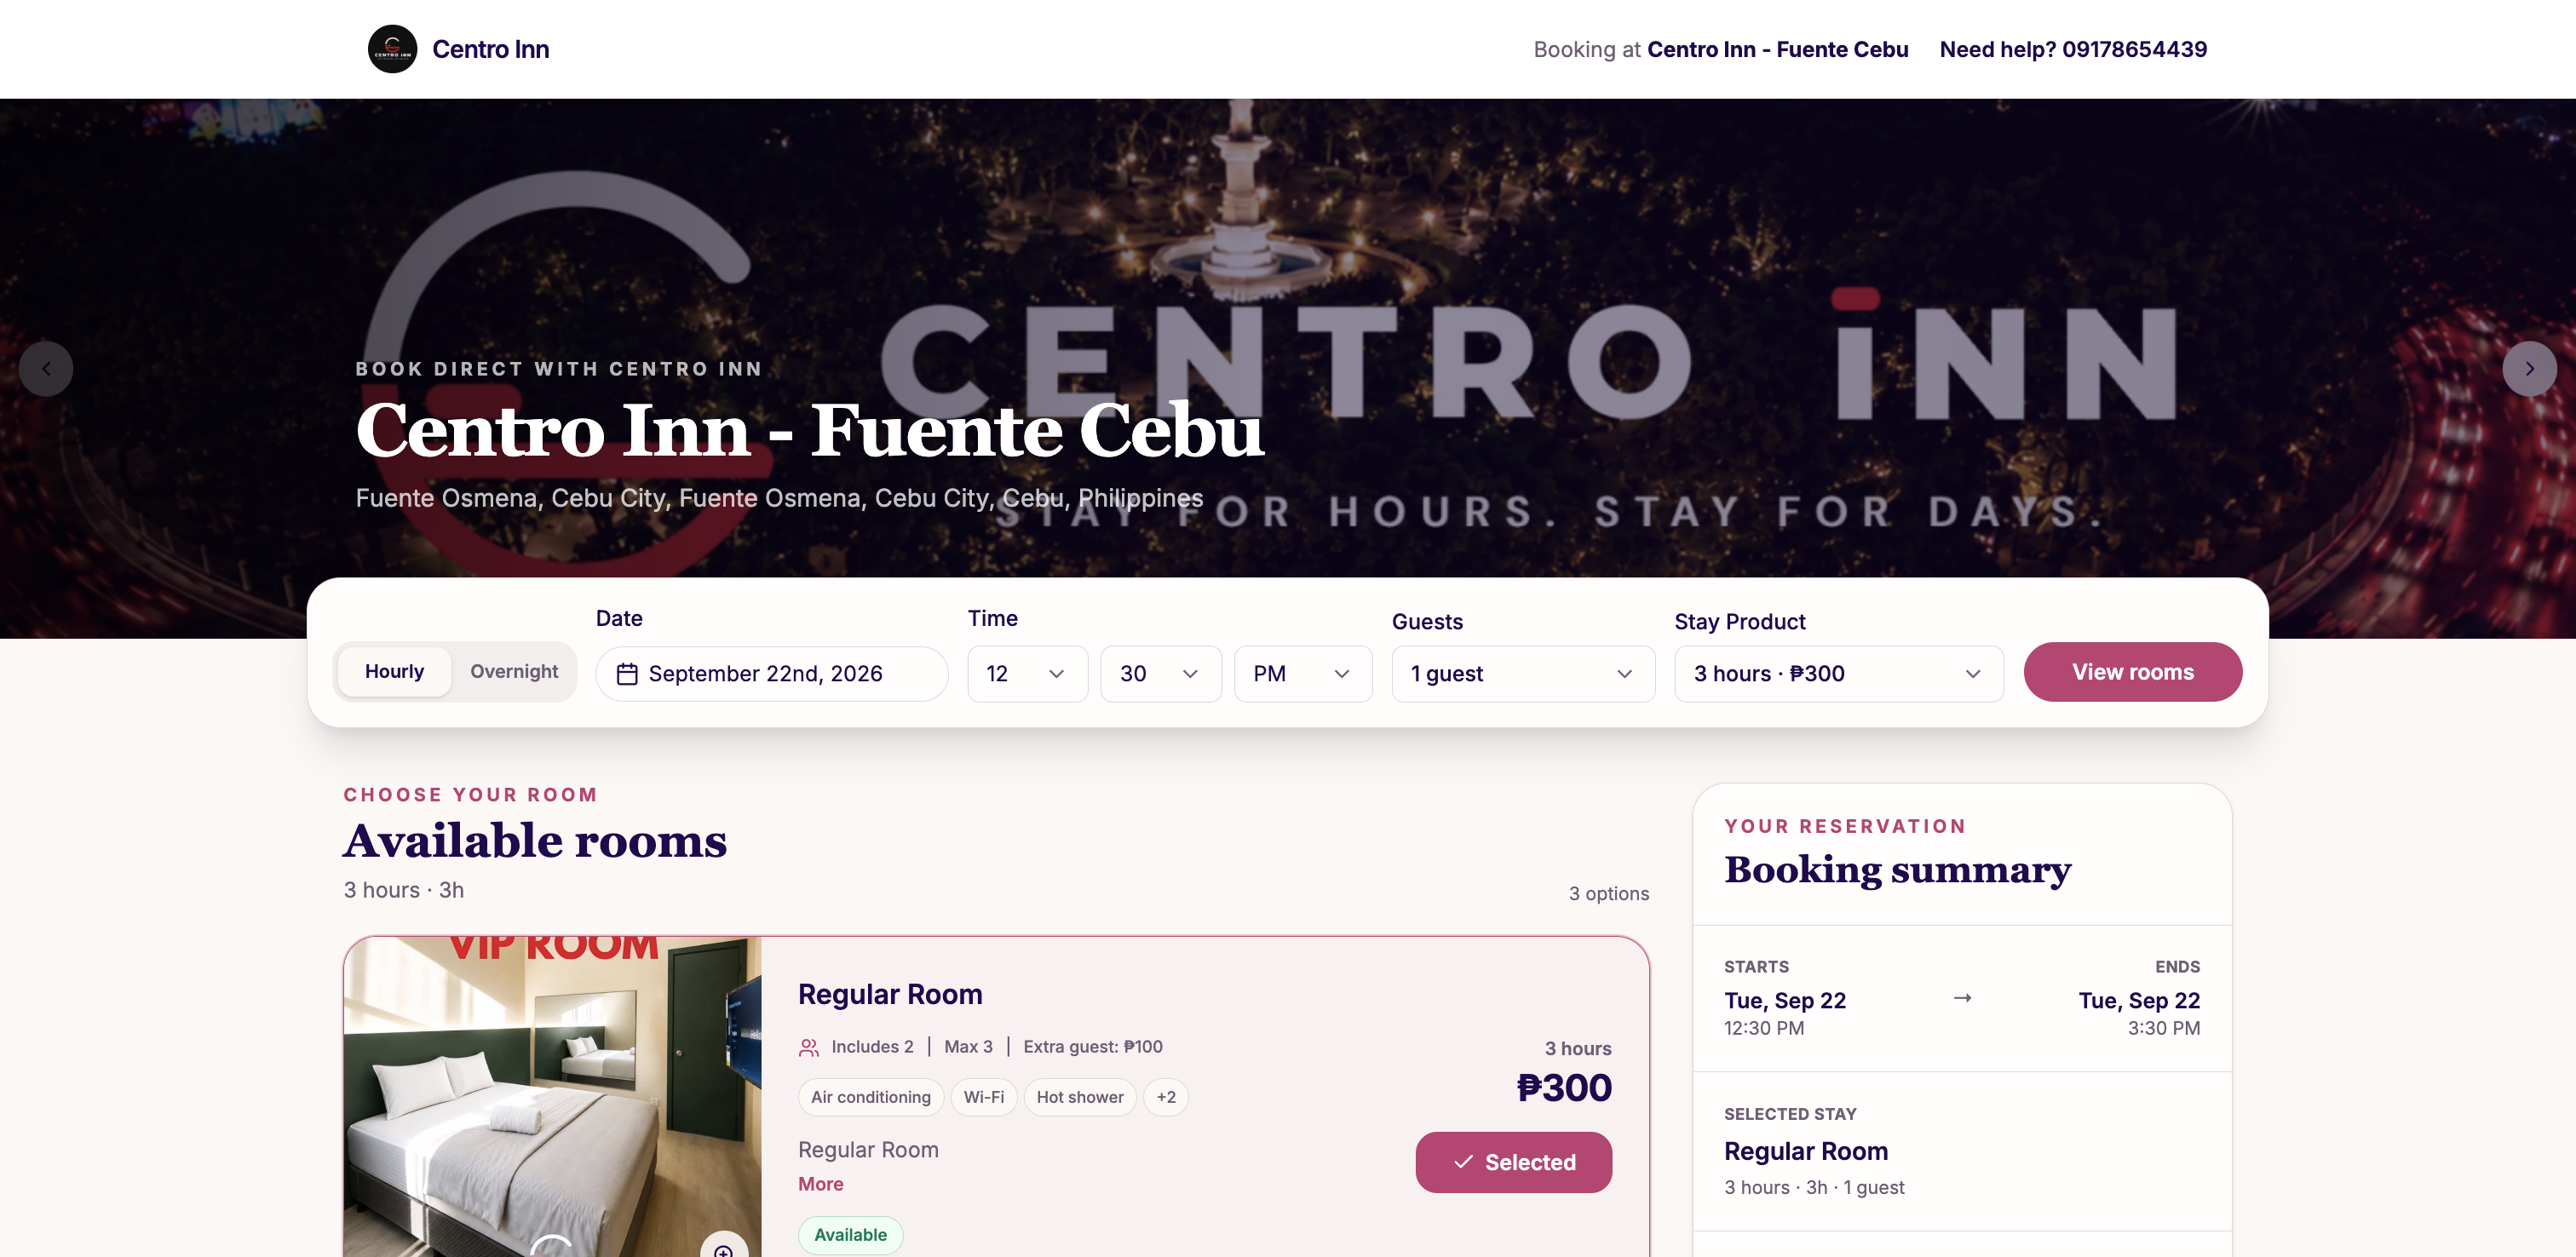
Public reservation form showing room, duration, guests, time, add-ons, contact fields, privacy mode, and policy notice

Step 3 · Reserve a stay

The customer chooses room type, duration, guest count, live start time, add-ons, and a promo or partner code. Name plus at least one contact method are required. Open full size.

04

Security and validation

Turnstile is completed and the server rechecks price, hours, availability, capacity, code validity, and add-ons before assigning a room.

05

Private confirmation

The customer receives status, schedule, room type, duration, total, policies, branch contacts, and a downloadable confirmation image.

06

Payment proof

When payment is due, the guest can submit a reference and image. The booking remains pending until staff verifies it.

Privacy mode and valid ID

Guests can enable privacy mode to replace their name with the confirmation code on operational screens. It does not erase the guest record. All guests must be 18 or older and present valid government-issued photo ID; staff reviews ID evidence during operations.

Run a complete test booking before launch

  • Open the live operator page and select the pilot branch.
  • Test each room type and duration combination for an available time.
  • Add products, apply a test code, and check the estimated total.
  • Submit with test contact details and save the confirmation code.
  • Submit non-sensitive payment proof and verify it from staff access.
  • Complete check-in, checkout, dirty-room, cleaning, and available states.

04 · Daily operations

Run the shift from one operating record

Front Desk is the live view, Bookings is the reservation register, Housekeeping controls room readiness, Payments controls collection status, and Guests provides the organization-wide customer directory.
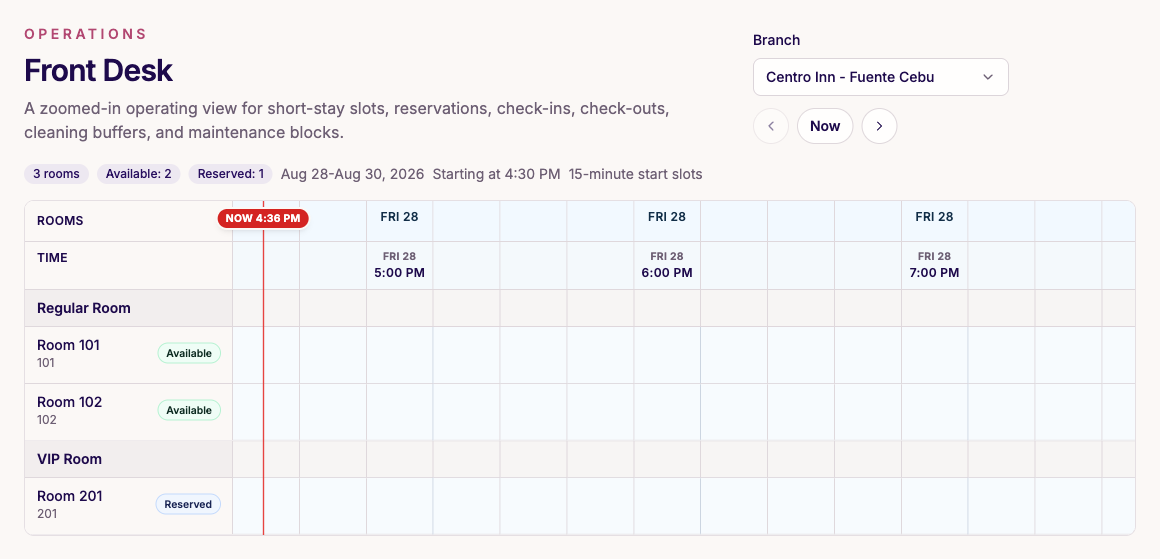
Front Desk room timeline with availability and reservation states

Front Desk: the live room timeline

Select a branch and date, then read room status, booking bars, cleaning buffers, maintenance blocks, and the red Now marker. Click an empty slot to create a booking or block. Open full size.

Booking actions

  • Create walk-in, Messenger, phone, staff, website, or other bookings
  • Check in and check out
  • Extend a stay or move rooms
  • Mark no-show or cancel
  • Add products, fees, discounts, and payments

Evidence review

  • Upload or replace guest ID
  • Mark ID verified or rejected
  • Review payment screenshots
  • Verify or reject pending proof
  • Keep customer and staff notes separate

The complete booking lifecycle

Follow the same handoff for every reservation.

1Accept
2Verify
3Check in
4Manage stay
5Collect
6Check out
7Clean
8Reconcile
01

Open the shift and review the branch

Work in: Front Desk, Housekeeping, Bookings, and Payments

Front Desk timeline at the start of a shift
Start on Front Desk, select the branch, and return the timeline to Now. Open full size.
  1. 1In Front Desk, select your assigned branch and choose Now. Confirm the date, timezone, and current-time marker.
  2. 2Read the counts for available, reserved, occupied, overdue, cleaning, dirty, blocked, and maintenance rooms.
  3. 3Scan the timeline for arrivals, stays ending soon, overdue rooms, cleaning buffers, and room blocks.
  4. 4Open Housekeeping and review Now, Next, and Blocked. Assign urgent cleaning and maintenance work.
  5. 5In Bookings, filter pending-payment and confirmed arrivals. In Payments, review pending proof and balances.
  6. 6Read the previous shift's staff notes and identify a named owner for every unresolved item.
Expected result: The incoming team knows every arrival, active stay, room issue, and payment requiring attention.
02

Accept and review an online booking

Work in: Bookings or a booking bar in Front Desk
Bookings register with sanitized booking codes and reservation statuses
Use filters and the sanitized booking register to locate the arrival and review status, schedule, room, ID, and payment. Open full size.
  1. 1Find the reservation by confirmation code, arrival time, guest, or status. Privacy-mode lists show the private code instead of the guest name.
  2. 2Open it and review branch, room, duration, guest count, schedule, add-ons, source, applied code, and total.
  3. 3Read customer notes, privacy status, contact details, branch policies, and the required payment amount.
  4. 4If proof was submitted, compare its channel, amount, and reference with the actual bank or merchant record.
  5. 5Select Verify only after collection is confirmed. Reject unreadable, duplicated, mismatched, or unreceived proof and request a replacement.
  6. 6Confirm the assigned room remains suitable and record any arrival issue in staff notes.

Important: Pending payment or pending proof is not collected cash and should not be treated as paid.

Expected result: The reservation is understood, payment is correctly classified, and the arrival has no hidden exception.
03

Create a walk-in, phone, or Messenger booking

Work in: Front Desk empty slot or Bookings → Create booking
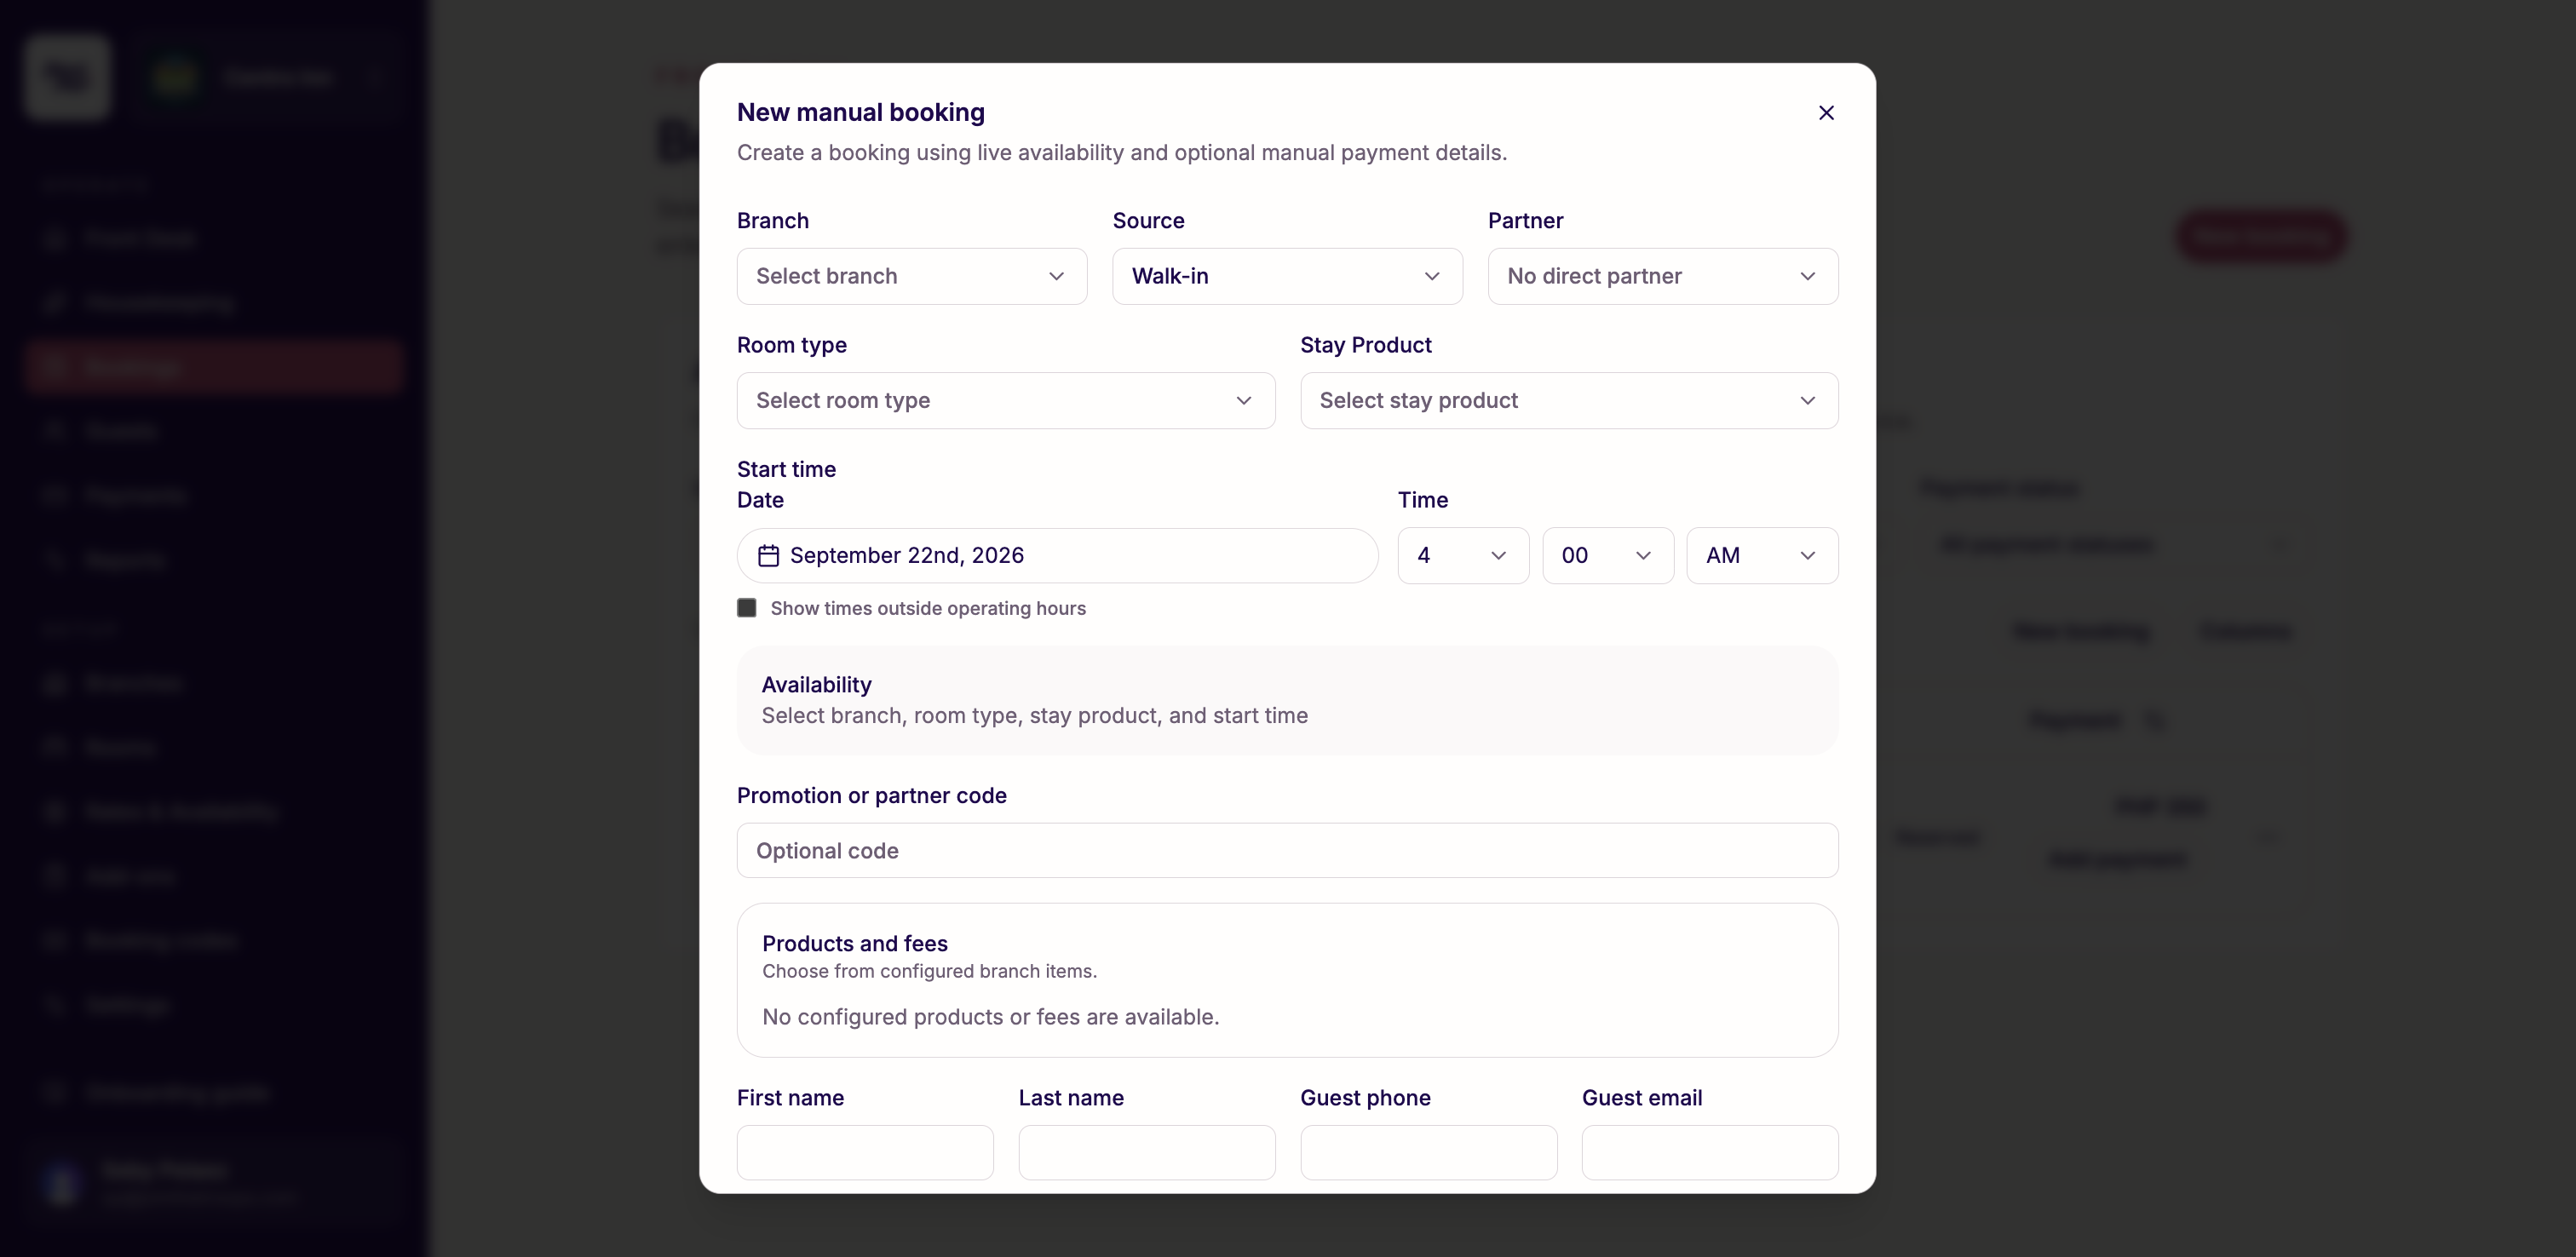
Complete New manual booking dialog with every field visible
The full manual-booking form is shown without cropping, from branch and duration selection through guest ID, payment, notes, and Create booking. Open full size.
  1. 1Select the correct branch. Click the intended empty slot and choose Booking, not Block, or select Create booking in Bookings.
  2. 2Choose room type and duration. Use automatic assignment unless a specific available room is required.
  3. 3Set start date and time. For a 24-hour duration, choose stay length. Review end time and cleaning buffer.
  4. 4Do not use the outside-hours staff override without management approval.
  5. 5Choose the real source: Walk-in, Messenger, Phone, Staff, Website, or Other. Apply only a code actually presented.
  6. 6Enter guest name, a reliable contact method, guest count, and requested products. Confirm capacity and extra-guest fees.
  7. 7Set privacy mode, separate customer requests from staff notes, and add ID evidence only when authorized.
  8. 8Choose no payment, immediate confirmed payment, or proof pending review. Record channel and reference accurately.
  9. 9Review room, schedule, charges, discount, total, and payment status with the guest before creating the booking.

Important: Creating a booking reserves inventory; it does not check the guest in. Complete arrival checks separately.

Expected result: A complete reservation is created against live inventory without a room or time conflict.
04

Verify the guest and check in

Work in: Front Desk booking action menu or Edit booking
Booking register showing verified ID, paid, reserved, and no-show states
Before Check in, confirm the booking shows the expected reservation, occupancy, ID, and payment states. Open full size.
  1. 1Match the confirmation code and booking details before revealing private guest information.
  2. 2Confirm all guests meet the branch age rule and inspect valid government-issued photo ID.
  3. 3Upload or replace ID evidence only if required, then mark it Verified or Rejected accurately.
  4. 4Check payment status and collect any required deposit or balance. Verify proof before treating it as paid.
  5. 5Confirm the assigned room is physically ready and shows Available, not dirty, cleaning, blocked, occupied, or maintenance.
  6. 6Review guest count, duration end time, house rules, included items, balance, and special notes with the guest.
  7. 7Select Check in and verify Front Desk now shows the room occupied and the stay in progress.
  8. 8If a requirement is not met, leave the booking un-checked-in and escalate under branch policy.

Important: Staff remain responsible for physically checking ID, payment, room readiness, and policy compliance.

Expected result: The guest is placed in a clean, available room and the booking becomes an active stay.
05

Manage an active stay

Work in: Front Desk booking action menu

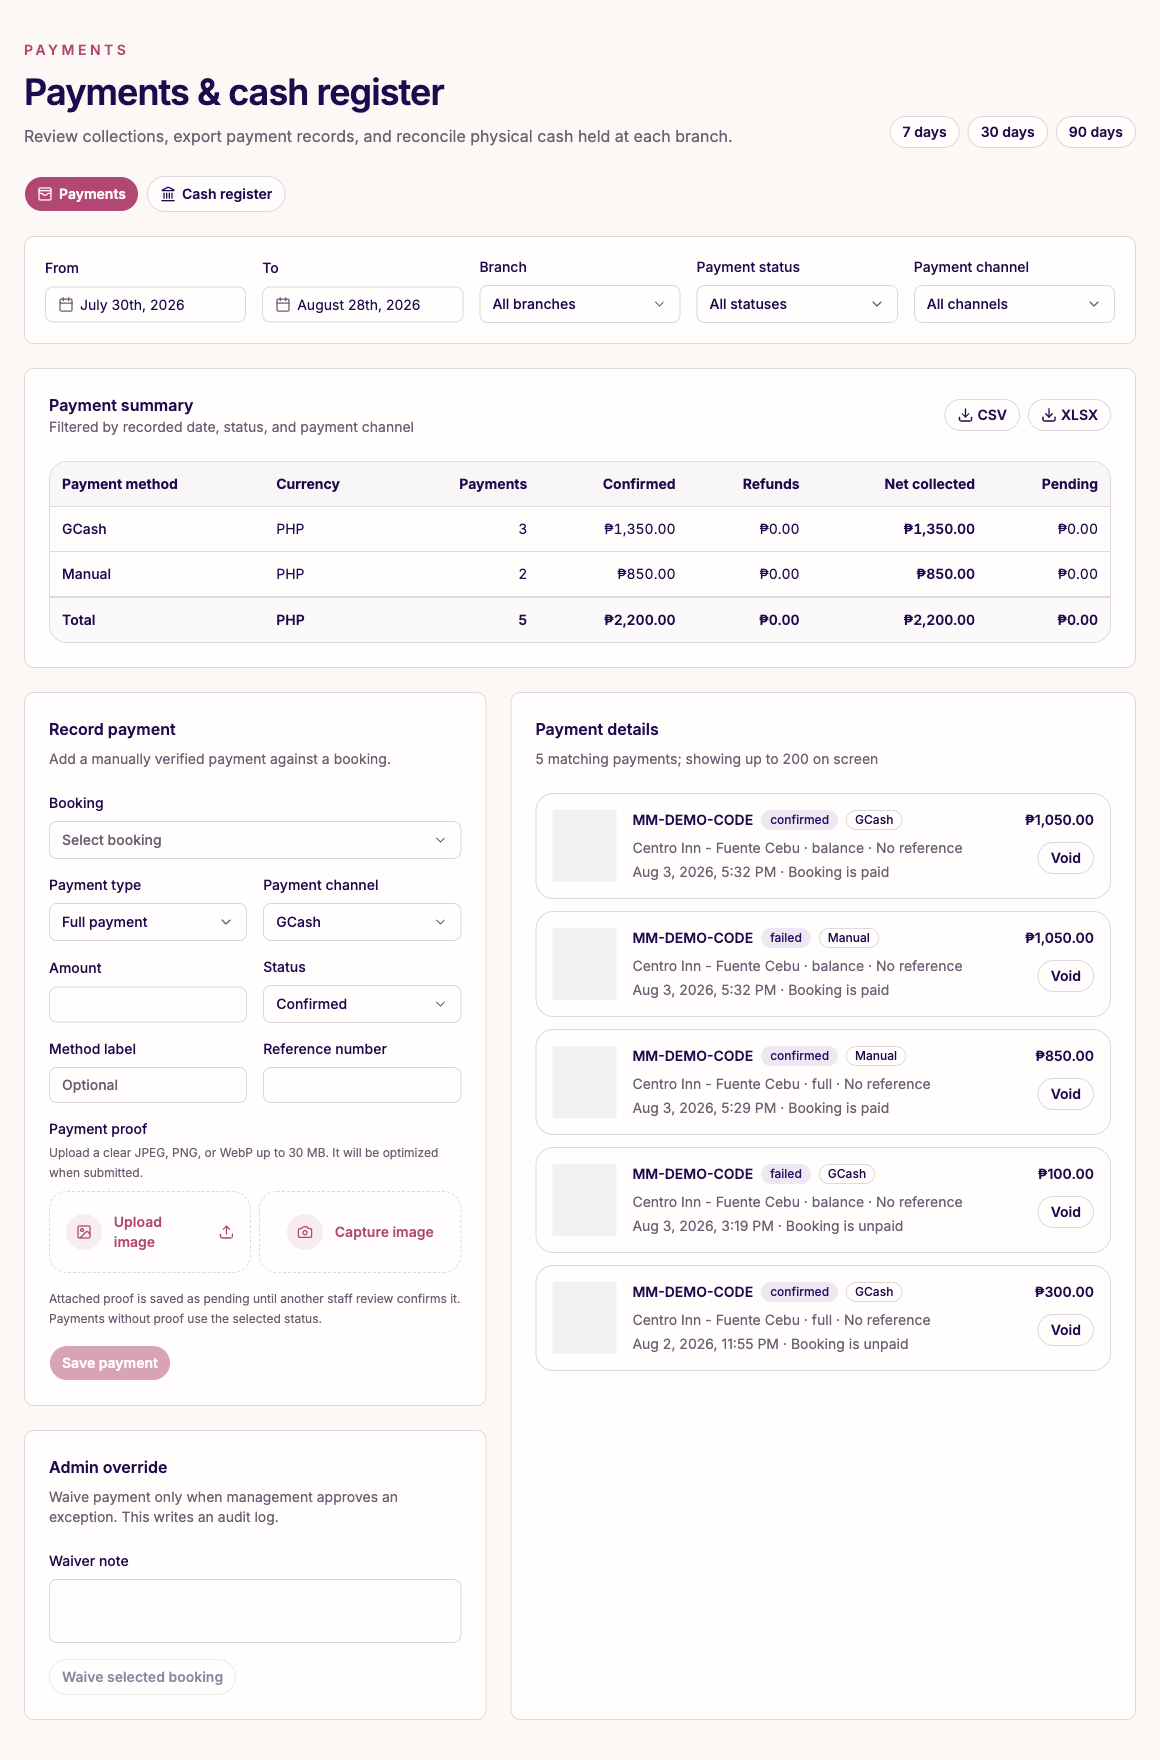
Sanitized Payments screen showing payment recording and payment history
Charges and collections must stay attached to the booking. Evidence thumbnails and confirmation codes are sanitized in this guide. Open full size.
  1. 1To extend, select Extend, choose a preset and quantity, and review the proposed end time.
  2. 2Confirm availability through the new end time and cleaning buffer before promising the extension.
  3. 3Apply a custom discount only with authorization and choose immediate, unpaid, or proof-pending payment treatment.
  4. 4To move rooms, select Move room and choose only an available compatible room. Verify both room states afterward.
  5. 5To add a product or fee, choose a catalog item or authorized custom charge and quantity.
  6. 6Record every payment, discount, refund, extension, and charge in Mojo Rooms, not only on paper or chat.
  7. 7Monitor overdue stays and follow branch escalation procedure before extending or checking out.
Expected result: Changes stay attached to the booking, availability remains accurate, and every amount is recorded.
06

Check out and hand the room to Housekeeping

Work in: Front Desk booking action menu, then Housekeeping
Payments review used before completing checkout
Review the full financial history and any failed or unverified record before selecting Check out. Open full size.
  1. 1Review end time, products, extensions, discounts, confirmed payments, pending proof, refunds, and balance.
  2. 2Add authorized final charges and collect or document the remaining amount under branch policy.
  3. 3Do not verify pending proof simply to close the booking; correct obvious payment-record mistakes first.
  4. 4Select Check out and confirm the booking becomes completed and the room becomes Dirty.
  5. 5Open Housekeeping and confirm the room appears with the correct cleaning deadline or next arrival.
  6. 6Pass maintenance, damage, missing-item, or priority information through a room block or staff note.
Expected result: The stay is completed, financial exceptions remain visible, and the room waits for cleaning.
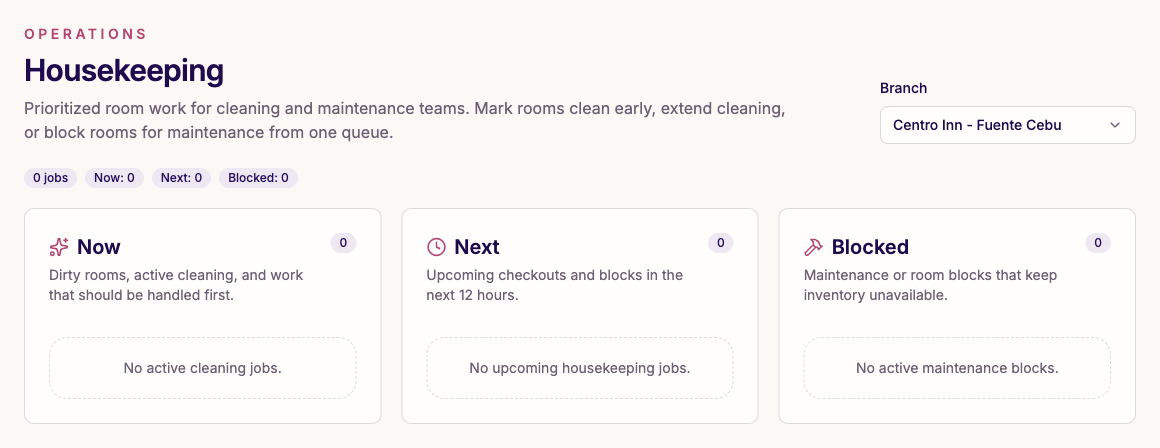
Housekeeping queues for current, next, and blocked room work

Housekeeping: return rooms to sellable status

Use Now, Next, and Blocked queues. Prioritize jobs, extend cleaning when needed, mark a room clean, add maintenance, and close completed blocks. Open full size.

07

Clean, inspect, and release the room

Work in: Housekeeping

Housekeeping Now, Next, and Blocked queues
Housekeeping separates immediate cleaning, upcoming turnover, and blocked or maintenance work. Open full size.
  1. 1Review Now, Next, and Blocked and prioritize by overdue cleaning, next arrival, and maintenance risk.
  2. 2Use Extend 15 minutes or Extend 30 minutes only when more time is needed.
  3. 3Complete the branch checklist and physically inspect the room before changing status.
  4. 4If a defect is found, add a maintenance block with duration and a useful note.
  5. 5Select Mark clean only when ready, then confirm the room returns to Available on Front Desk.
  6. 6Close completed maintenance blocks and verify the final room state before promising it to a guest.
Expected result: The room returns to Available only after cleaning and physical inspection are complete.
08

Handle cancellations, no-shows, refunds, and exceptions

Work in: Bookings, Front Desk, and Payments

Bookings register showing a no-show and rejected payment proof
The sanitized second row demonstrates that No Show, Not Arrived, and Proof rejected are separate operational and payment states. Open full size.
  1. 1Read the branch cancellation, refund, no-show, and payment policies before promising an outcome.
  2. 2Use Cancel before arrival. Use Mark no-show only after the arrival window passes without check-in.
  3. 3Record a factual reason in staff notes and confirm room availability is released correctly.
  4. 4Cancellation does not automatically refund money. Record an approved refund separately in Payments.
  5. 5For rejected proof, request valid replacement evidence. Void duplicate or erroneous records instead of deleting history.
  6. 6Escalate chargebacks, policy disputes, safety incidents, and suspected fraud while preserving the audit trail.
Expected result: Inventory is released correctly and the audit trail matches what happened financially.
09

Close and hand over the shift

Work in: Front Desk, Payments → Cash register, and Reports
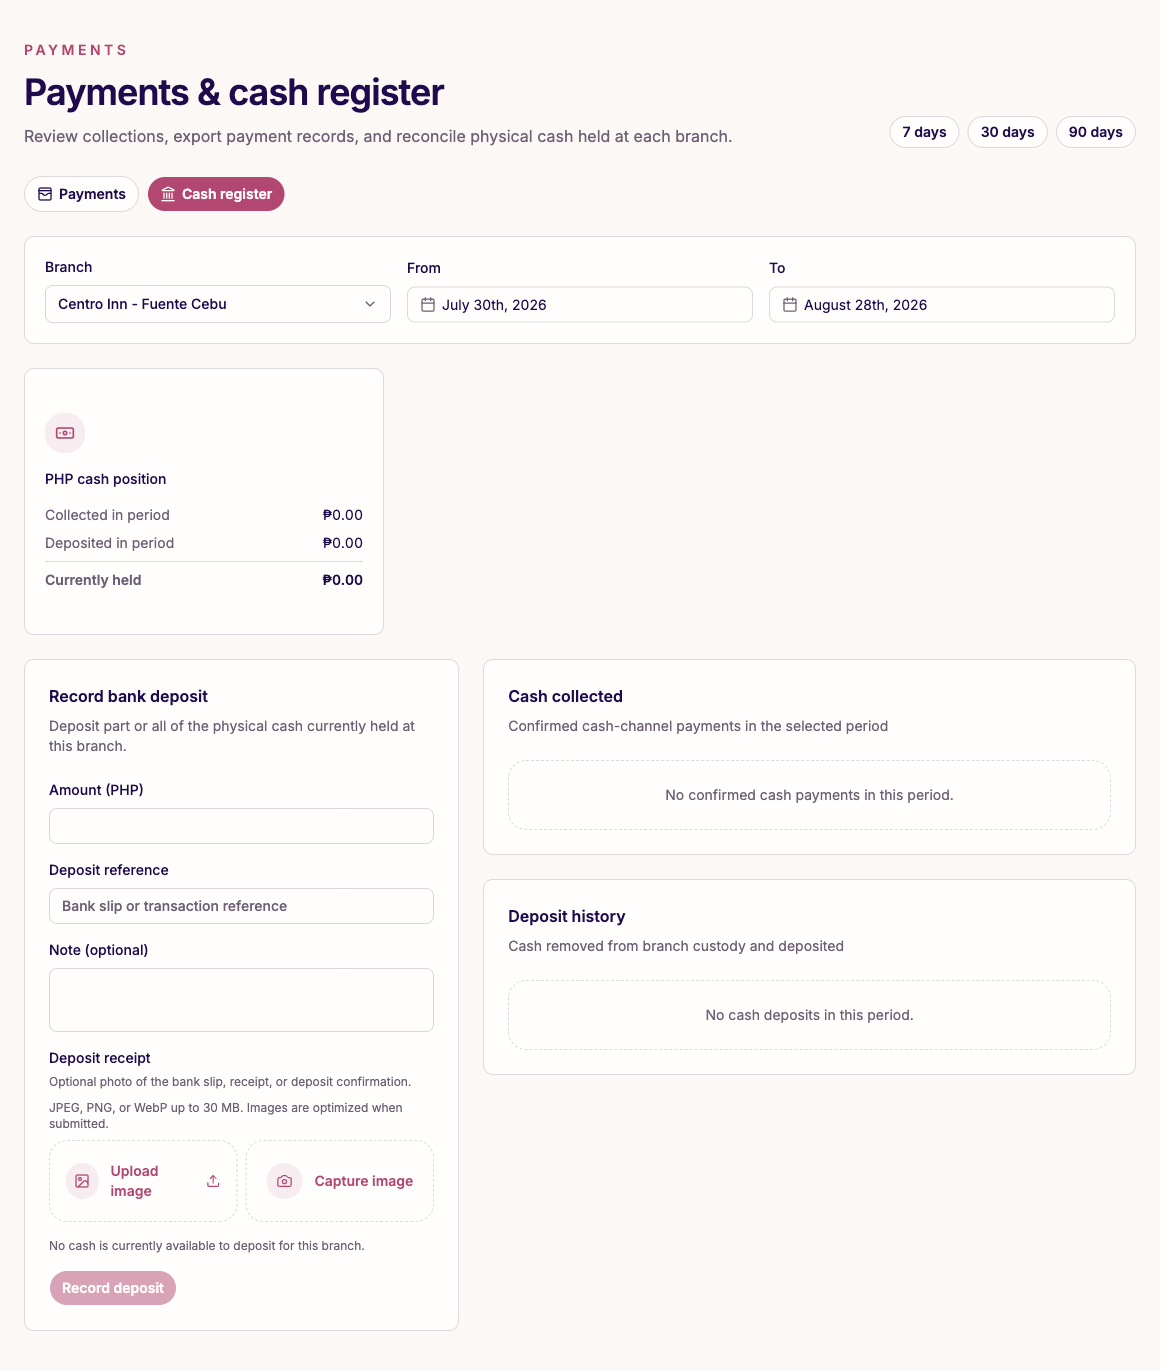
Complete Cash register screen with cash position, deposit form, collections, and deposit history
Use the complete Cash register view to compare cash held, record a deposit, and review collection and deposit history. Open full size.
  1. 1Return Front Desk to Now and resolve or explain every overdue stay, dirty room, cleaning job, and block.
  2. 2Review upcoming arrivals, pending-payment bookings, proof awaiting review, balances, and no-show candidates.
  3. 3Compare physical cash with confirmed cash collected, refunds, deposits, and the displayed cash held.
  4. 4Record bank deposits with amount, currency, reference, and receipt. Investigate differences rather than forcing balance.
  5. 5Confirm all manual collections are attached to the correct booking and export records when required.
  6. 6Write a handoff with confirmation code, room, issue, deadline, action taken, and owner for the next step.
  7. 7Sign out or lock the workstation; never leave guest, payment, or ID screens open.
Expected result: The next team receives an accurate room board, payment position, and action list.

Bookings

  • Search by code, guest, room, duration, source, partner, or code
  • Filter reservation, occupancy, and payment status
  • Create and edit manual bookings
  • Open action and evidence history

Guests

  • Search by name, email, or phone
  • Review latest branch, booking, and marketing status
  • Copy confirmed subscriber emails
  • Export selected subscribed contacts

Payments

  • Filter collections and pending proof
  • Record deposits, balances, payments, or refunds
  • Verify, reject, void, or waive
  • Export and reconcile the branch cash register

A proof upload is not a confirmed payment

Guest or staff evidence creates a pending payment record. Compare the amount, channel, reference, and screenshot before selecting Verify. Only confirmed activity is counted as collected cash in reports.

Booking and room status quick reference

Pending payment

Reservation exists, but required payment is not confirmed. Review proof or collect payment.

Confirmed / Reserved

Accepted future arrival. The guest is not checked in yet.

Checked in / Occupied

Guest has arrived and the assigned room is in active use.

Overdue

Scheduled end time passed without checkout or extension. Staff action is required.

Completed / Checked out

Stay ended. The room normally passes to Dirty and Housekeeping.

Dirty / Cleaning

Room is not sellable while cleaning or inspection is in progress.

Available

Room is clean, unblocked, and may be assigned if no booking conflict exists.

Blocked / Maintenance

Room is intentionally unavailable until the block is completed.

Cancelled / No-show

Reservation did not proceed. Review inventory release and any separate refund.

05 · Management

Turn activity into decisions and controls

Managers use Reports to compare demand and collections, Team to enforce least-privilege access, Settings to maintain the booking brand, and Marketing to control branch-level conversion tracking.
Performance overview with bookings, utilization, room inventory, booking value, and finances

Reports: understand bookings, utilization, and cash

Choose a branch and date range, then use Overview, Bookings, Revenue, Partners & codes, and Forecast. Booking value and confirmed collections are reported separately. Open full size.
Read reports correctly

  • Gross and net booked measure reservation value
  • Collected and refunds measure confirmed payments
  • Utilization compares occupied with sellable room-hours
  • Forecast covers the future period already on the books

Manage by branch

  • Compare branch performance consistently
  • Audit incomplete branch readiness
  • Review durations, room types, and booking sources
  • Use branch-scoped access for local managers
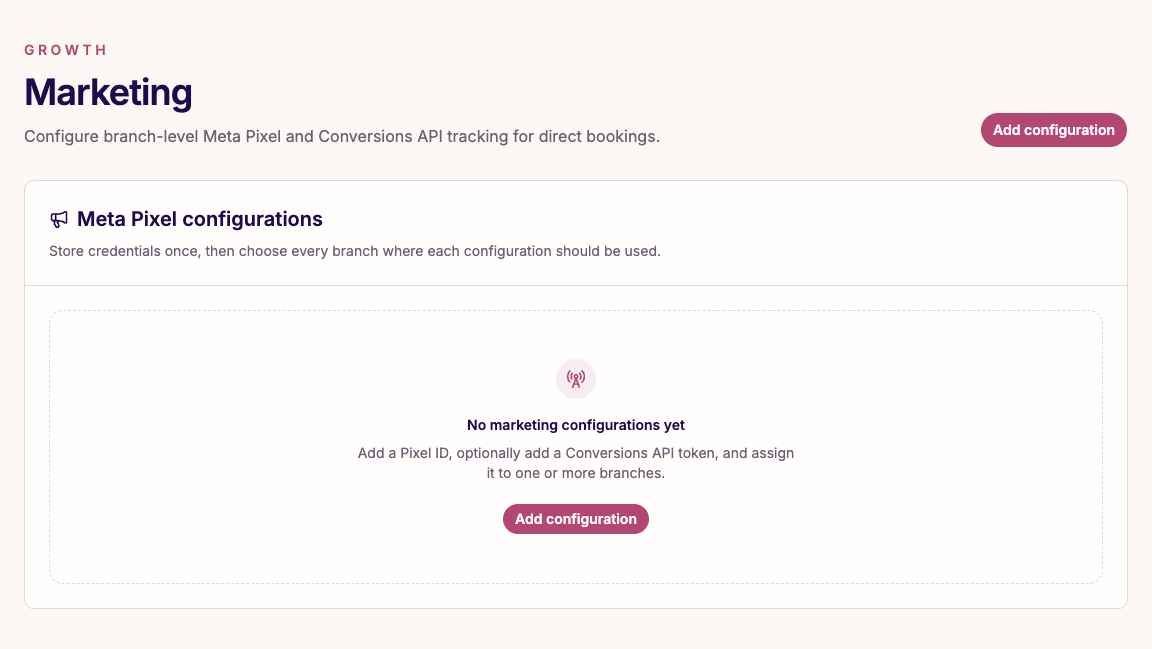
Marketing page for Meta Pixel configuration

Marketing: connect direct-booking attribution

Store a Meta Pixel ID, optionally add a Conversions API token, and assign it only to the branches where it should run. Open full size.

06 · Roles and access

Give each person only the access they need

Invite people in Team & access, then assign an operational role and branch scope. New members remain unassigned until an administrator completes this step.

Administrator

All workspace, setup, team, operational, and reporting access.

Manager

Operations, setup, payments, and reports for all or assigned branches.

Front Desk

Front Desk, Housekeeping, Bookings, and Payments for assigned branches.

Housekeeping

Cleaning, maintenance, and room-status work only.

Reporting

Read-only Reports access for assigned branches.

Access review routine

  • Assign selected branches unless organization-wide access is necessary.
  • Remove former staff immediately and review pending invitations.
  • Use Reporting for people who should not change operational records.
  • Keep Team administration limited to trusted administrators.
  • Review role and branch assignments whenever responsibilities change.

07 · Go-live

Complete one end-to-end rehearsal

A successful launch is an operational rehearsal, not only a configuration check. Use this sequence with the real staff who will own each handoff.

  1. 1

    Confirm the pilot branch shows 100% setup readiness.

  2. 2

    Invite staff and verify every role sees only its assigned sections and branches.

  3. 3

    Make a direct test booking and confirm price, availability, privacy mode, and policies.

  4. 4

    Verify payment proof, review ID evidence, and check the guest in.

  5. 5

    Extend or add a charge, then check out and mark the room dirty.

  6. 6

    Let Housekeeping complete cleaning until the room is available again.

  7. 7

    Review the booking, payment, guest, and report records created by the rehearsal.

  8. 8

    Document who handles disputes, rejected proof, no-shows, maintenance, and cash reconciliation.

Ready to set up your first branch?

Open Mojo Rooms in a second tab and work through this guide in order. For a guided rollout, contact the Mojo Rooms team.